Creating a professional and attractive website has become more accessible than ever, thanks to the advent of user-friendly website builders. Among the numerous options available, the Hostinger Website Builder stands out for its ease of use, affordability, and comprehensive features. Whether you’re a business owner, blogger, or creative professional, the Hostinger Website Builder can help you establish a robust online presence. In this blog, we’ll walk you through the process of getting started with the Hostinger Website Builder, from signing up to publishing your first website.
Why Choose Hostinger Website Builder?
Before diving into the how-to, let’s briefly discuss why you might choose the Hostinger Website Builder over other options.
- Ease of Use: The Hostinger Website Builder is designed with beginners in mind. Its intuitive drag-and-drop interface makes it easy for anyone to create a website without needing to learn coding or web design.
- Affordability: Hostinger offers competitive pricing plans, making it an attractive option for individuals and small businesses looking to build a website on a budget.
- Customization: With a wide range of templates and design options, you can create a website that reflects your brand’s personality and style.
- Performance: Hostinger provides reliable hosting with fast loading speeds and high uptime, ensuring your website remains accessible to visitors.
- Support: Hostinger offers 24/7 customer support, so you can get help whenever you need it.
Step-by-Step Guide to Using Hostinger Website Builder
Step 1: Sign Up for Hostinger
The first step to creating your website with the Hostinger Website Builder is to sign up for a Hostinger account. Follow these simple steps:
- Visit Hostinger’s Website: Go to Hostinger’s website.
- Choose a Plan: Browse the available plans and select one that fits your needs and budget. Hostinger often offers discounts, so keep an eye out for any deals.
- Create an Account: Provide your email address and create a password to sign up. Alternatively, you can sign up using your Google or Facebook account.
- Complete the Purchase: Enter your payment details and complete the purchase. Once your payment is processed, you’ll receive a confirmation email.
Step 2: Access the Hostinger Website Builder
After signing up, you can access the Hostinger Website Builder from your Hostinger dashboard. Here’s how:
- Log in to Your Hostinger Account: Use your email and password to log in to your Hostinger account.
- Navigate to the Website Builder: From the dashboard, look for the “Website Builder” option and click on it.
- Select a Domain: If you haven’t already, you’ll need to choose a domain name for your website. You can either purchase a new domain through Hostinger or use an existing one.
Step 3: Choose a Template
One of the standout features of the Hostinger Website Builder is its collection of professionally designed templates. Here’s how to select and customize a template:
- Browse Templates: Explore the wide range of templates available. Hostinger offers templates for various industries and purposes, from blogs and portfolios to online stores and business websites.
- Preview Templates: Click on any template to see a live preview. This helps you get a feel for how your website will look and function.
- Select a Template: Once you find a template you like, click “Select” to start customizing it.
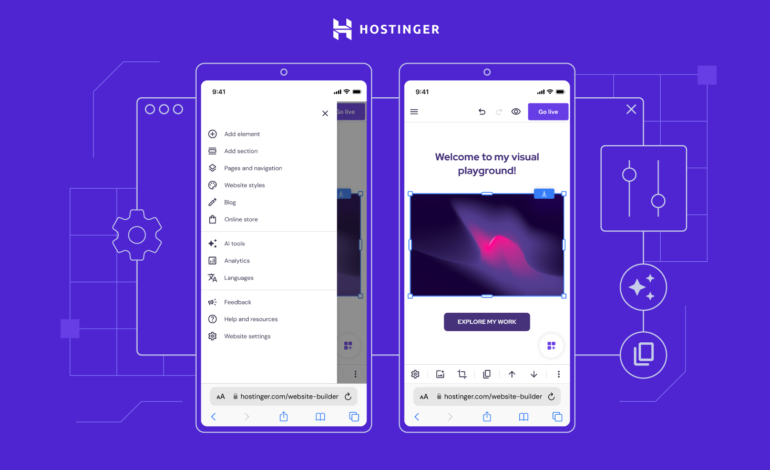
Step 4: Customize Your Website
With your template selected, it’s time to make it your own. The Hostinger Website Builder makes customization straightforward with its drag-and-drop interface.
- Edit Text and Images: Click on any text or image block to edit its content. You can change fonts, colors, and styles to match your brand.
- Add New Elements: Use the toolbar to add new elements such as text boxes, images, videos, buttons, and more. Simply drag the element onto your page where you want it.
- Arrange Layout: Rearrange elements on your page by dragging and dropping them into place. The builder provides grid lines and snapping to help you align elements perfectly.
- Customize Pages: Navigate to different pages of your website (e.g., Home, About, Contact) and customize each one individually. You can add new pages or delete existing ones as needed.
Step 5: Add Functionality
To make your website more interactive and functional, the Hostinger Website Builder allows you to add various features and integrations.
- Contact Forms: Add a contact form to allow visitors to get in touch with you. Customize the fields and design to suit your needs.
- Social Media Integration: Link your social media accounts to your website. Add social media icons and feeds to keep your visitors connected.
- E-commerce Features: If you plan to sell products or services, you can set up an online store. Add product listings, configure payment options, and manage orders directly from the website builder.
- SEO Tools: Use the built-in SEO tools to optimize your website for search engines. This includes adding meta titles, descriptions, and keywords.
Step 6: Preview and Test
Before publishing your website, it’s important to preview and test it to ensure everything looks and works as expected.
- Preview Mode: Switch to preview mode to see how your website will look on different devices, including desktops, tablets, and smartphones.
- Test Functionality: Test all interactive elements such as links, forms, and e-commerce features to make sure they function correctly.
- Check Responsiveness: Ensure that your website is responsive and looks good on various screen sizes. The Hostinger Website Builder automatically adjusts your design for different devices, but it’s still a good idea to review it.
Step 7: Publish Your Website
Once you’re satisfied with your website, it’s time to publish it and make it live.
- Review Settings: Double-check your website settings, including the domain name, SEO settings, and privacy options.
- Click Publish: When you’re ready, click the “Publish” button. Hostinger will take care of the rest, making your website accessible to the world.
- Monitor and Update: After publishing, continue to monitor your website’s performance and make updates as needed. The Hostinger Website Builder allows you to make changes and republish your website at any time.
Tips for Success with Hostinger Website Builder
To make the most of the Hostinger Website Builder and create a successful website, keep these tips in mind:
- Plan Your Content: Before you start building, plan the content and structure of your website. Outline the pages you need and the information you want to include.
- Keep It Simple: Aim for a clean and straightforward design. Avoid clutter and focus on delivering a clear message to your visitors.
- Use High-Quality Images: High-quality images can significantly enhance the visual appeal of your website. Use professional photos and graphics that align with your brand.
- Optimize for SEO: Take advantage of the SEO tools provided by Hostinger. Optimize your website’s content and structure to improve its visibility on search engines.
- Regularly Update Your Content: Keep your website fresh by regularly updating your content. This not only engages visitors but also helps with SEO.
- Utilize Analytics: Use website analytics to track visitor behavior and performance. This data can help you make informed decisions about improving your website.
- Seek Feedback: Don’t hesitate to ask for feedback from friends, family, or colleagues. They can provide valuable insights and help you identify areas for improvement.
Conclusion
The Hostinger Website Builder is a powerful and user-friendly tool that makes website creation accessible to everyone. By following the steps outlined in this guide, you can build a professional and attractive website that meets your needs and goals. Whether you’re launching a personal blog, a business website, or an online store, the Hostinger Website Builder provides all the tools and features you need to succeed.
With its ease of use, affordability, and robust support, the Hostinger Website Builder is an excellent choice for anyone looking to establish an online presence. So why wait? Sign up for Hostinger today and start building your dream website!
Remember, the key to a successful website is not just in its creation but in its ongoing maintenance and improvement. Stay engaged with your audience, keep your content up to date, and continuously look for ways to enhance your site. With dedication and the right tools, your website can become a valuable asset that supports your personal or business goals.